Saturday, April 6, 2013

How to Pass Command Line Arguments using Visual Studio ?

How to Pass Command Line Arguments using Visual Studio ?

   Visual Studio enables a nice features where you can do this in the Project Properties window, on the Debug tab. Here is the steps to achieve this
1. Right Click on Project from Solution Explorer and Select Properties.
2. In the Project Properties Windows, Navigate to “Debug Tab”
3. You will Find the a text box “Command Line”
Well, here you can type the command line with separated by Space.


Just write a simple console application to print the command line argument, and put a breakpoint to check the arguments,
So, the each value separated by space has taken has a a command line argument. This will produce below output.


Introduction to Metro UI in Windows8

Introduction to Metro UI in Windows8


As technology progresses, we, being on the eco-system of Microsoft is continuously getting more and more updates in terms of technology, both in pipeline of actual technology update as well as User interface improvements. User Interface plays a key role for any application. Even though how good your application performs, if the application UI is not good, it will definitely get lot less points than it should actually get. In the last decade, the development world continuously shifted its balance towards rich user interface. The inclusion of WPF, Silverlight for web, AJAX,  HTML5, Windows phone applications etc are some of the examples which lets you understand where the world is moving.
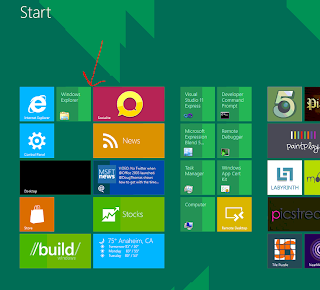
Microsoft has been continuously following the trait and introduced a new set of UI’s for us in the new version of Windows released. The very first screen that you see when you open your Windows 8 PC is the Start Screen. The Start screen has been widely changed, there is no Start menu, there are live tiles etc.  Lets take a look at the screen:
So basically you see large number of small boxes in the UI which represents Tiles. These tiles is actually links to an application. The kind of app that it represents are very rich, interactive and secure. The kind of application is what we call metro application.
After you install Metro application, (If you cannot do installation, please follow my blog) you should see Visual Studio 2011 Express tile in your screen. Click on that tile, and you will see our very old desktop (which is represented as tile here in windows 8) to appear.
Create a new Application from the New Dialog box and click ok to create from templates.
It shows there are quite a number of templates available to build Metro style applications. It has support for Javascript in forms of HTML 5 or XAML native applications and .NET Languages. In our case I have chosen SplitApplication which creates an application that layout two columns.  Lets create an application using a template and click run.
You will see the application takes the whole screen area. We dont close a metro application, operating system is responsible for doing the same for us.
So to move back to the desktop either you press Win + Tab or move the mouse on the lower left corner of the screen and click on the charm appears on the screen.
Hence without writing a single line of code, our application is ready. We will look into detail later in the series.


How to use Application Bar in windows 8

How to use Application Bar in windows 8

Application bar is one of the interesting feature for any Metro style applications. Application bar allows you to define standard set of options that your application needs to use at certain context. Metro style applications are generally very clean and does not have any visual portion sharing between toolbars or application options. The app bar is the options that appear dynamically to the user when the user swipe up in the device or use Windows +Z from the keyboard.


Generally we create one application bar for the whole application, but you can also make more than one while developing an application. If you are developing an application with one bar, it is recommended to align it at bottom.
How to add an appbar on your own application
Lets take a look how you can add an appbar into your application. ApplicationBar is inherited from ContentControl, which supports swipe behaviour, also it adds up one control in its child as content. You are allowed to add more than one element as Content using StackPanel or any other panel you want to use.
<ApplicationBar VerticalAlignment="Bottom" DismissMode="LightDismiss">
             <StackPanel Orientation="Horizontal">
              <Button Click="btnStartTracking_Click" />
              <Button Click="btnEndTracking_Click" />
          </StackPanel>
         </ApplicationBar>
Here the applictionbar is added at the bottom of the application which will have two buttons. You need to create a style for these buttons if you wish this to look better. Among many other properties of applicationbar, one of the most important on is DismissMode. DismissMode determines when the application bar is going to dismiss. You can use TimeDelay, to automatically dismiss the appbar after certain amount of time, you can use EdgeSwipe which will dismiss when the application edge is swiped, but the preferred one is LightDismiss. This option will dismiss the applicationbar as soon as the user taps anywhere outside of the application.
I hope the tips comes handy. Stay tune for more.

Saturday, March 30, 2013

How to Set up Windows XP mode in Windows 7


How to Set up Windows XP mode in Windows 7
If you want to use Windows XP as a guest operating system, you will have to use the Virtual Windows XP downloadable package available from the same website. When you use this package with Windows Virtual PC, it automatically creates a virtual machine for it with a version of Windows XP installed on the virtual hard disk.

To set up Windows XP mode:

1. Double-click VirtualWindowsXP.msi
2. The Virtual Windows XP wizard will open. Proceed through the steps of the wizard to complete the installation.
3. When the virtual machine is booted up or started for the first time, the Virtual Windows XP license agreement appears. To use Virtual Windows XP, you must obviously accept it. Then click on Next to continue.
4. Set up a password for the “User” account. This is the account with administrator privileges that the wizard creates automatically. It is also the default account used to run Windows XP mode. Make sure you check “Remember credentials” if you don’t want to enter the password each time you start Windows XP mode.
5. After Windows Virtual PC configures Virtual Windows XP, the virtual machine will be ready to be used.

Windows 7:How to Use a USB device in a virtual machine


How to Use a USB device in a virtual machine
Windows Virtual PC supports the use of USB 2.0 devices, either by sharing the device or by redirecting the device to the virtual machine. The method you use will depend on which type of USB device you intend to use. When integration components are installed in the Virtual Windows XP, storage devices are automatically shared with virtual machines on a physical computer. For other types of devices like WebCams, Wireless network adapters, PDA’s and mp3 players, you can use redirection.

To redirect a USB device to a virtual machine:

• Attach the device to the computer and turn on the device.
• From the virtual machine window, click on USB and then click on Attach ‘&lt;device name&gt;’.
• After the device driver is installed, you can use the USB device from within the virtual machine the same way as you would on a physical computer. However, USB devices that are connected using these steps cannot be shared, so they must be released from one operating system to be available for use on the other operating system.
• To make the USB device available back on your host Windows 7 installation, release it from the virtual machine. From the virtual machine window, click on USB and then click on ‘Release &lt;device name&gt;’.


Note :- Only For Windows 7

Internet Explorer Tricks


Create your web Shortcuts
To create a new shortcut to a Webpage, open Notepad and type [InternetShortcut] on the first line, then URL = followed by the address of the page on the second line. Save the file with a .URL extension. If you save it in \Windows\Favorites folder, it will be added to the Favorites list in your browser.

Pick Your Wallpaper
Right click on any image in your browser and select Set as Wallpaper to make it your desktop wallpaper. Internet Explorer will copy the image to the Windows folder and set it as the wallpaper.

Find Sites With AutoComplete
Whenever you begin typing a URL in the address box, it tried to find a recently visited page that matches what you are typing. If IE finds a match, it automatically fills in the rest of the address for you. This is not only convenient, it can also be useful if you remember only a part of on Internet address. You can turn the feature on or off from Tools > Internet Options > Advanced. Scroll down to use inline AutoComplete for Web address. Toggle this on or off.

Temporary files
Clearing the browser cache can retrieve disk space and can also avoid problems on certain Web pages. To clear the files, open Tools > Internet Options. Under the General tab, click on Delete Files to clear the cache.

Offline Web Pages
You can set a page as "offline" so you can read it even when you're not connected. On the Favorites menu, click Add to Favorites. Enable Make available offline. To specify a schedule for updating the page and how much content to download, click Customize. Follow the instructions on screen.

Script errors
You can turn off useless script error messages from popping up. Click on Tools > Internet Options > Advanced. Click the checkbox labeled Disable script debugging. Uncheck the checkbox labeled Display a notification for every script error.

Searching with Style!
With Internet Explorer, you can search with more than one search engine. click search on the toolbar and click Customize. Customize your search form the window that opens.

Never lose an Interesting site like SoftwareTipsandTricks!
If you remember visiting a site a week or two ago that you forgot to add to your favorites list, you can still fine it. the History folder maintains a list of all the sites that you visited for a set number of says. To set the number of days. click Tools > Internet Options. Under the General tab, set the Days to Keep Pages in History. You can enter any number between 0 and 999.

Save or print links
You can save or print the information from linked Web pages without displaying the page on screen. Right-click the link and click Save Target As to save the linked page to your hard disk or Print Target to print the linked page.
 

Some Windows Shortcuts


Windows Key Shortcuts

[Windows]
Open or close the Start menu

[Windows] + PAUSE
Display the System Properties dialog box

[Windows] +D
Display the desktop

[Windows] +M
Minimize all windows

[Windows] +SHIFT+M
Restore minimized windows to the desktop

[Windows] +E
Open Computer

[Windows] +F
Search for a file or folder

CTRL+[Windows] +F
Search for computers (if you are on a network)

[Windows] +L
Lock your computer or switch users

[Windows] +R
Open the Run dialog box

[Windows] +T
Cycle through programs on the taskbar

[Windows] +TAB
Cycle through programs on the taskbar by using Windows Flip 3-D

CTRL+[Windows] +TAB
Use the arrow keys to cycle through programs on the taskbar by using Windows Flip 3-D

[Windows] +SPACEBAR
Bring all gadgets to the front and select Windows Sidebar

[Windows] +G

List of Windows Keyboard Shortcuts


List of Windows Keyboard Shortcuts


General Shortcuts  

These are applicable to nearly all Windows programs.

[F1]
Display Help. When in Windows Explorer or viewing the desktop, this shows you Windows Help. Otherwise, shows you the active program’s documentation.

[Ctrl] + [C]
Copy the selected item or text

[Ctrl] + [X]
Cut the selected item or text

[Ctrl] + [V]
Paste the selected item or text

[Ctrl] + [Z]
Undo the last action

[Ctrl] + [Y]
Redo the last action

[Delete]
Delete the selected item and move it to the Recycle Bin

[[Shift]] + [Delete]
Delete the selected item without moving it to the Recycle Bin first

[F2]
Rename the selected item

[Ctrl] + [Right Arrow]
Move the cursor to the beginning of the next word

[Ctrl] + [Left Arrow]
Move the cursor to the beginning of the previous word

[Ctrl] + [Down Arrow]
Move the cursor to the beginning of the next paragraph

[Ctrl] + [Up Arrow]
Move the cursor to the beginning of the previous paragraph

[Ctrl] + [[Shift]] + an arrow key
Select a block of text

[[Shift]] with any arrow key
Selectmore than one itemin a window or on the desktop, or select
text within a document

[Ctrl] with any arrow key + [Space]
Select multiple individual items in a window or on the desktop

[Ctrl] + [A]


Thursday, March 28, 2013

Download Windows 8 Consumer Preview


Download Windows 8 Consumer Preview


System Requirements:
* Processor: 1 gigahertz (GHz) or faster
* RAM: 1 gigabyte (GB) (32-bit) or 2 GB (64-bit)
* Hard disk space: 16 GB (32-bit) or 20 GB (64-bit)
* Graphics card: MicrosoftDirectX 9 graphics device or higher

New Features:
* Swipe, slide, and zoom - Touch a full-powered PC. It's fast and it's fluid. Take natural, direct, hands-on control.
* Apps, front and center - Apps in Windows 8 work together to get things done faster. Get them from the Windows Store. 
* Your Windows, everywhere - Windows 8 can connect you to your files, photos, people, and settings, wherever you sign in. 
* Wall-to-wall web - Internet Explorer 10 Consumer Preview brings you immersive web browsing on screens big and small. 
* The familiar, made better - Still devoted to your mouse and keyboard? Windows 8 makes the tried-and-true feel brand new.